Call us now: 888 540-2010,  416 833-3501   10am – 6pm ET

General Information
Supported Drives
DiskSense Units
Training
Testimonials

Ordering

Pricing
Lifetime Warranty

Features

Disk Diagnostics
Disk Duplication
Selective Head Imaging
File Recovery
Password Removal
Firmware Recovery
Disk Utilities
Case Management

Information

FAQ
Version log

Disk Duplication

Disk-to-disk duplication

Hard drive duplication is the most important part of the data recovery or data acquisition process. Trying to extract files directly from the original HDD is dangerous because the hard drive can fail at any moment. This means the technician must transfer the data quickly and safely from the original HDD to a backup HDD and only then proceed with file extraction using the backup.

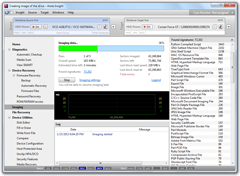
The Atola Insight is the industry's most efficient system for imaging hard drives quickly and safely. Its maximum imaging speed is 180 MB/s.

Please note that this is the measured speed that we have achieved on real hard drives (please see screenshot on the right) and not "theoretically achievable" speed that many other tools claim.

Table of contents:

Target HEX Viewer

Imaging damaged disk drives

Hard drives with physical damage require a quite complex imaging approach. Specifically, the following techniques are used in Atola Insight in order to achieve the best results:
  • Multi-pass imaging with different timeouts for each pass
  • Reducing read block size to a very small value
  • Utilizing PHY reset and interface reset feature
  • Disable bad sector auto-reallocations
  • Imaging data from good heads only
  • Bad sector recovery (How it works)
  • Programmable behavior and even more fine-tuning for the toughest cases
A few words on block size control. While it is important to use small block sizes in order to get as much data as possible, using small blocks significantly slows down the imaging process. However, with Atola Insight's industry leading multi-pass imaging engine, it is possible to use large blocks with short timeouts on the first few passes, and then use smallest block sizes on the last pass when only few sectors left to be transferred.

This technique allows to achieve real imaging speeds of up to 180 MB/sec on good areas of the drive, while approaching bad areas in the most gentle way possible, thus achieving an unbeatable overall speed of disk duplication.

The best part is that Atola Insight will handle block sizes automatically, thus providing the best possible results in the shortest amount of time. This allows Atola Insight to be faster on virtually any job than any other data recovery or acquisition tool available on the market.

Target HEX Viewer

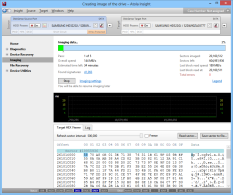
The real time viewer of imaged data! It shows all bytes already written to a target drive during imaging. There are two modes available:

  • Automatic with refresh interval slider
  • Manual by means of Read sector button

Customize every step of the process

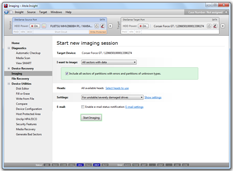
Disk duplication session

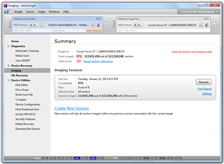
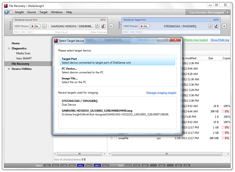
The Atola Insight is able to image entire hard drives, select partitions or specific sector ranges. The newly created image can be stored either on a destination hard drive or the host computer. A data wipe function is also available to quickly and easily write any pattern to the destination hard drive if necessary to prepare it for a new image.

All parameters can be adjusted in a very simple way to fine-tune the process and meet the needs of a specific case. The Atola Insight is able to image damaged or unstable hard drives in the field that cannot be imaged by regular forensic products. This means technicians can image more hard drives in the field without needing to take them back to their labs.

Multiple hashing methods are available and hashes are calculated on the fly. GList auto reallocation can be disabled to prevent the hard drive from contaminating evidence by remapping sectors.

Major Imaging Parameters

Disk duplication settings
  • Calculate hash (pre-hash, during imaging, post-hash): MD5, SHA (1, 224, 256, 384, 512)
  • Auto-compare option
  • Specify read/write heads to transfer data from
  • Disable GList auto reallocation
  • HEX pattern to fill skipped sectors (00 by default)
  • Read timeout setting
  • Number of sectors to skip after a failed read attempt
  • Number of passes
  • Apply Read-Long command on last pass (see Bad Sector Recovery)
  • Reduce HDD operating speed to PIO mode
  • Copy direction (forward/linear or reverse)
  • Abort duplication if after X amount of HDD power cycles
  • Image file size (chunk size)

Visual representation of imaging status

Duplication of damaged HDD

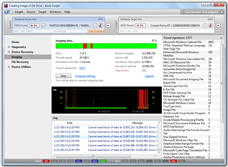
The Atola Insight's real-time imaging status screen provides all vital information to the operator as well as full control over the process (please see screenshot on the right).

Visual feedback includes:

  • Overall map of the hard drive surface showing good and bad areas
  • Statistics (speed, good/bad sectors stats, ETA)
  • By-head read speed graph (allows for early detection of a failing head)
  • Log screen

Based on the data being displayed throughout the imaging process, the operator has the option of making on-the-fly changes to the parameters. For example, the operator can not only adjust timeouts, but also add another imaging pass to the end of the function to revisit areas with multiple errors, or add a specific behavior on a certain condition (power cycle after X errors, etc).

The following actions can be performed during imaging:

  • Stop the process (can be seamlessly resumed later at any time)
  • Restart imaging from any sector right away by pointing and clicking the overall map bar
  • Change any setting and apply it immediately without even pausing the process

This kind of flexibility is unmatched by any other data recovery or forensic tool.

When the imaging is complete, all status information is automatically sent to the Case Management and File Recovery modules.

Data-Only copy option

Data-only disk imaging

This option gives the user the ability to only copy occupied sectors from the source hard drive. This can greatly reduce the time spent on data transfer and relieve strain on the source hard drive.

Supported file systems: NTFS (all versions), Ext 2/3/4, HFS, HFS+, HFSX, ExFAT, FAT16, FAT32.

Image file creation

Copying the source disk into an image file is fast and easy using the Atola Insight. Just select a storage location on the host PC or media and specify the image file size (put all data in 1 image file or "chunk" the data into a series of smaller files).

Fully integrated with file recovery module

Disk duplication integration with File Recovery

At the end of the duplication process, the Atola Insight creates a Bad Sector Map and stores it in the Case History. When the File Recovery module is started, it automatically refers to the Bad Sector Map, and marks all files hit by bad sectors.

A list of recovered files has already been recorded during imaging, and the data is ready for browsing, so there is zero time loss on this stage. This system is much more efficient than using one product for imaging and another for file recovery, because the operator would have to image the hard drive and then re-scan it with file recovery software when using two separate products.

Two hardware options to meet your needs

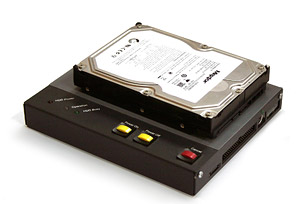
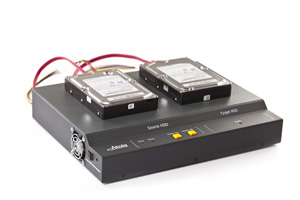
The Atola Insight system is offered with 2 options for the DiskSense unit, which is the physical tool that mounts the hard drive and connects to the operator's computer. The DiskSense USB unit offers a lower investment price and transfers data at speeds up to 40 MB/sec (UDMA speed). The DiskSense Ethernet unit utilizes a faster 180 MB/sec interface for data transfer functions with 2 ports to allow for direct disk-to-disk duplication.

DiskSense USB
DiskSense USB Unit

DiskSense USB

  • Source HDD SATA and IDE ports
  • Native ATA/IDE and SATA I/II/III interface support
  • Supports hard drive to host duplication via USB (40 MB/sec max transfer speed)
  • Supports hard-drive to hard-drive duplication through host computer using USB interface (2.4 GB/min max transfer speed)

DiskSense Ethernet
DiskSense Ethernet Unit

DiskSense Ethernet

  • Source HDD SATA and IDE ports
  • Target SATA port for super-fast disk-to-disk transfers
  • Native ATA/IDE and SATA I/II/III interface support
  • Supports source HDD to host duplication via Ethernet (85 MB/sec max transfer speed)
  • Supports source HDD to target HDD duplication via Ethernet (180 MB/sec max transfer speed)

Frequently Asked Questions

Click questions to expand text

  1. How does the Atola Insight compare to other imagers?
    We believe the Atola Insight is the strongest imaging/duplication system available on the market. It has every feature advertised by other products and much more. Atola products also have the smoothest, most user friendly interface of any imager on the market and we offer the strongest technical support to help users maximize their success with our product.
  2. How often does the Insight actually image at the “max” speeds that are listed on this website?
    The “max” speeds listed on this website have been lab-tested for accuracy on modern hard drives. The actual speed of duplication (or any data transfer) depends on the speed of hard drives used in the process. During HDD-to-HDD duplication, the slower hard drive will determine the actual transfer speed because one hard drive can only receive data as fast as the other can send it, and visa versa.

  3. Does Atola Insight utilize BIOS and/or Operating System functions in the DiskSense Ethernet unit to image data?
    DiskSense Ethernet unit runs a Linux OS. We have built a highly-customized and fine-tuned kernel for this Linux OS, and our modifications block all BIOS and standard Linux I/O operations and allow the lowest level of control for SATA and IDE ports. More information is available here: DiskSense Ethernet: under the hood
  4. Can I purchase this imaging system without the rest of the Atola Insight modules like diagnostics and firmware repair?
    Yes, Atola Imager is basically the Imager-Only version of the Atola Insight. It come standard with the DiskSense Ethernet hardware unit and has all of the features listed on the Atola Insight’s Disk Duplication webpage. Click above links to visit product webpages.
  5. Why would I need to wipe/erase a hard drive before imaging it?
    Some specific data recovery or forensic investigation scenarios require the destination hard drive to be wiped/erased. This is usually done to make sure the software being used to recover files won’t extract old data that was previously on the destination HDD.