|
|
Atola Insight
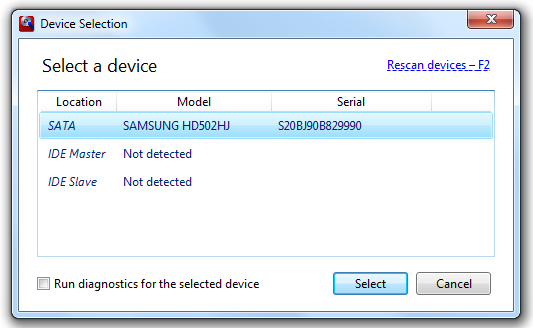
Attaching hard drives and starting Atola InsightThe purpose of this page is to provide information on Atola Insight start up procedure. Generally speaking, the only thing that is mandatory to start Atola Insight software is DiskSense unit that has to be attached and powered on before you launch the program. Atola Insight requires a working DiskSense unit because it contains an electronic encryption key that is required for normal software operation. You do not need to attach or power on any hard drives before starting Atola Insight. Supported hard drivesBoth Atola Insight software and Atola DiskSense hardware natively support all hard drives and SSD devices that utilize either IDE (all PIO and UDMA modes) or SATA (I and II) interfaces. Both software and hardware also support any other device attached via IDE or SATA adapter (Compact flash cards, Secure Digital cards, 1.8-inch hard drives and so on). Please note that at this time Automatic Diagnostics works only with 3.5-inch, 2.5-inch and 1.8-inch hard drives. Flash devices are currently not supported by Automatic Diagnostics routine. Important note on Slave devices Device Selection dialogDevice Selection dialog is available from main menu (Source -> Select Source...) or via F3 shortcut button:
At this point you can either manually select the port you'd like to work with (SATA, IDE Master, IDE Slave) or use Rescan Devices button to allow Atola Insight to query all ports for attached devices. Please note that clicking Rescan Devices will power on the hard drive attached to the DiskSense unit. Let's click Rescan Devices and see what Atola Insight finds:
After you select the device, Atola Insight switches to the main application window. Attaching and detaching hard drivesYou can attach and remove hard drives at any time without restarting the software or hardware unit. The only limitation of DiskSense is that you cannot attach two hard drives simultaneously. For example, you cannot attach two IDE hard drives (Master and Slave) or one IDE and one SATA hard drives to the same DiskSense unit. When replacing hard drives, Atola Insight detects the change automatically. However, if you'd like to manually re-identify a hard drive, you can do one of the following:
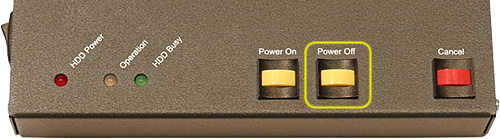
The difference is that re-identification works only when the attached hard drive can provide at least some identification data. If the hard drive has some severe damage (for example, fried PCB) and therefore won't return identification data, Atola Insight will fail to automatically recognize such hard drive. In this case you have to use Device->Select Another menu item to manually select the device; Atola Insight will still be able to diagnose a hard drive that is "completely dead", but you will have to select the proper channel (SATA, IDE Master or IDE Slave). It is wise to use Power Off button (on DiskSense) to shut down the hard drive before disconnecting:
Alternatively, you can use Power Off button in Atola Insight software:
There's no need to manually power on hard drives; the software does that when needed (with your permission). Back to Atola Insight User's Manual |